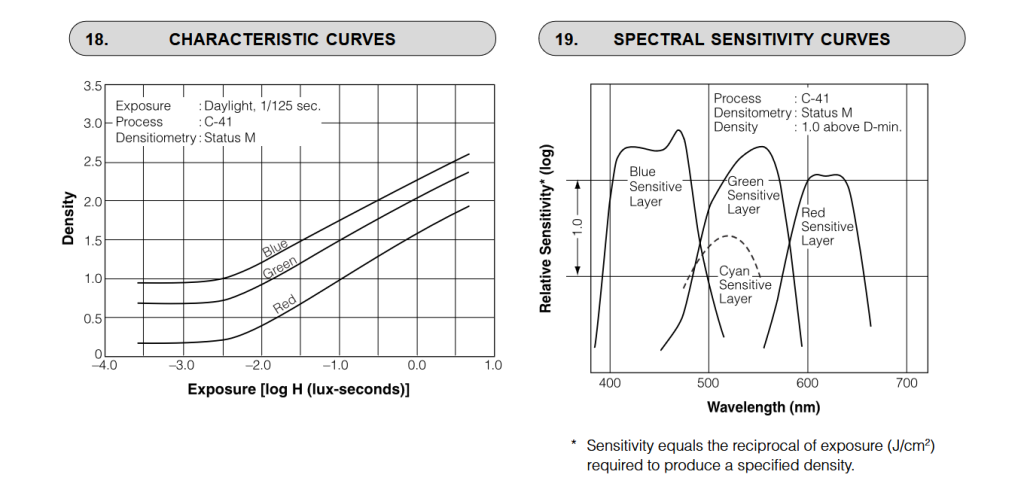
When I’m not working on LAS, I’ve been trying my hand at digital film emulations, which is basically making digital pictures look like they were shot on 35mm camera film.
I love film, but it costs too much and I don’t have time to use it for my personal photography. While I love the look that it produces, we shouldn’t be romantic about what film is — a few layers of silver halide crystals deposited onto a transparent-ish film substrate. Color film is just that, but with layers for red, green, and blue.
I also made a few attempts at a neural-film simulation, and in my opinion that’s probably the solution that will win out. Sadly, the code I have for it is not in a working state, and I’m at a bit of a roadblock with it.
So, in the spirit of procrastination, I tried something akin to a physical simulation. We create 3 virtual layers, each with 6 million virtual grains (this is more or less 4K resolution), each grain represented by a voxel.
We then project our source image (a regular digital photo) onto each layer, and each grain has a probability of being exposed based on light intensity, exposure time, layer sensitivity, grain size, and physical position in the emulsion.

This all sounds super cool, but right now it needs to be heavily tweaked before it will produce good and reliable results. I was able to get some grainy images out of it, which is a great start, but each layer needs to be tuned.
Rather than copy and paste the specific non-working code, I’ve asked Claude 3.5 Sonnet to convert what I have into detailed Python psuedo-code. If you pop this into your LLM of choice, it will be able to expand the code without much issue.
I used the following academic papers for reference with this project:
- The Chemistry of Photographic Color Dye Formation
- Chemistry of Photography
- Chemistry and Processes of Color Photography
# PHYSICAL FILM SIMULATION PSEUDOCODE

# Data Structures
class EmulsionLayer:
    """Single color-sensitive layer in film"""
    properties:
        thickness: float (microns)
        depth: float (distance from surface in microns)
        grain_density: float (grains per cubic micron)
        base_sensitivity: float
        development_curve: [min_density, max_density, gamma]

class FilmStock:
    """Complete film emulsion structure"""
    properties:
        name: string
        grain_size_distribution: [mean_size, standard_deviation]
        layers: [RedLayer, GreenLayer, BlueLayer]
        halation_radius: float
        development_gamma: float
        cross_layer_bleeding: float
        grain_clumping_factor: float

# Main Processing Pipeline
def process_image(input_image):
    """Main film simulation pipeline"""
    1. Load and normalize input image (0-1 range)
    2. Scale to match grain resolution (~6MP)
    3. For each layer (R,G,B):
        a. Generate 3D grain pattern
        b. Expose grains to light
        c. Develop exposed grains
    4. Apply cross-layer effects
    5. Apply halation
    6. Scale back to original resolution
    7. Return processed image

# Grain Generation and Exposure
def generate_physical_grain_pattern(dimensions):
    """Create 3D voxel grid of film grains"""
    1. Calculate physical dimensions in microns
    2. Create 3D voxel grid based on:
        - Target of 6M grains per layer
        - Physical layer thickness
        - Grain size distribution
    3. For each voxel:
        a. Generate random grain size from distribution
        b. Determine grain presence based on density
    4. Apply grain clumping effect
    5. Return 3D grain pattern

def expose_grains(grain_pattern, light_intensity):
    """Simulate light exposure of grains"""
    1. Calculate exposure for each grain:
        exposure = light_intensity * exposure_time * sensitivity
    2. Calculate probability of grain exposure:
        probability = 1 - exp(-exposure)
    3. Create exposed grain pattern
    4. Return exposed pattern

# Development Process
def develop_layer(exposed_grains):
    """Simulate chemical development"""
    1. Apply characteristic curve:
        density = min_d + (max_d - min_d) * (exposure ^ gamma)
    2. Account for development temperature
    3. Apply development time effects
    4. Return developed grain pattern

# Physical Effects
def simulate_cross_layer_interaction(layers):
    """Chemical bleeding between layers"""
    1. For each layer pair:
        a. Calculate physical distance between layers
        b. Apply exponential decay based on distance
        c. Simulate chemical diffusion
    2. Return modified layers

def simulate_halation(image):
    """Light scatter in film base"""
    1. For each layer:
        a. Calculate scatter radius based on depth
        b. Create depth-dependent scatter kernel
        c. Apply scatter effect
    2. Return image with halation

def project_3d_to_2d(grain_pattern_3d):
    """Convert 3D grain pattern to 2D image"""
    1. Create depth-based attenuation map
    2. Weight grains by depth position
    3. Account for light scattering
    4. Sum contributions through depth
    5. Normalize and preserve grain density
    6. Return 2D projection

# Configuration
film_config:
    # Physical parameters
    voxel_size: 1.0 microns
    grain_size_mean: 0.8 microns
    grain_size_std: 0.2 microns
    layer_thickness: 6.0 microns

    # Exposure parameters
    exposure_time: 1.5 seconds
    base_sensitivity: [1.2, 1.0, 0.9]  # RGB

    # Development parameters
    development_time: 6.0 minutes
    development_temperature: 20.0 C
    development_gamma: 1.1

# Main Program Flow
1. Load configuration
2. Initialize film stock
3. For each input image:
    a. Load and prepare image
    b. Process through film simulation
    c. Save processed image
Be First to Comment